Thursday, July 16, 2009

Cupid


Click on image to view full size

I use PSP 7, but assume this can be made with any version

Supplies:

Tube of choice
I used the awesome art of Dominic Marco ,
which you can now purchase at CILM
you must have a license to use his work.

PTU scrap kit "Cupid" by ScrappingMar , which you can purchase
at the Paradise 4 Scrappers store here

Template 58 by Yvette of Essense of Creativity
which you can download here


Plug in: Xenofex>Constellation

Font of choice

~~~*~~~

OK, let's get started!

Open your template, duplicate and close the original.
Re-size to 800 x 800
(we will be re-sizing it smaller at the end)
Delete copyright layer.

Flood fill white your background layer.

Select big heart layer, selections>select all>
float>defloat >Copy and paste paper 21
as a new layer>
selections invert>delete>
delete the original template layer.

Now apply drop shadows:
V=3 H=3 O=60 B=5
and V= -3 H= -3 O=60 B=5

Apply the above steps to these layers:
~Small Hearts with paper 11
~Rectangle layer with paper 12
~Dotted heart layer with paper 26


Open element 6>re-size 80%>copy>
paste above white layer
rotate right 15 degrees
add drop shadow
V=3 H=3 O=60 B=5

Open element 8>copy>paste atop element 6
add drop shadow

Open element 7>re-size 90%
copy>paste atop element 8
add drop shadow

Copy>paste element 16 atop element 7
add drop shadow

Select your big heart paper layer
selections>select all> float>defloat
open element 45>paste into selection
apply Xenofex>constellation with these settings:
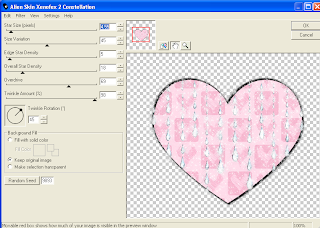
Selections>select none

Copy>Paste your tube of choice (I re-sized mine 125%)


Now we are going to have some fun and embellish the tag!
Feel free to get creative here and use the elements that
best match your tube. Here's what I used:

(see my tag for placement)

Open element 2>re-size 25%
copy>paste along left side of template
drop shadow

Open element 7>re-size 30%
copy>paste along left side of template
drop shadow

Open element 10>re-size 30%
copy>paste along left side of template
drop shadow

Open element 30>re-size 30%
copy>paste at bottom of flower stem
drop shadow

Open element 20>re-size 50%
copy>paste along right side of template
drop shadow


Now resize your tag to 600 X 600.
Add your name, and your copyright if needed,
delete your white layer and save as a PNG and that's it!!

Thanks so much for trying my tut!!

Tuesday, July 14, 2009

Aloha from Hawaii

Click on image to view full size

I use PSP 7, but assume this can be made with any version

Supplies:

Tube of choice
I used the sexy art of Andy Screen ,
which you can now purchase at MPT
you must have a license to use his work.

FTU scrap kit "Sherbet Trio" by Lori at Wacky Scraps ,
which you can download here

Lori site totally rocks!! Tons of awesome freebies!!!!

Template "Aloha" by Stef at
Freebie Friends Scraps & More
which you can download here


Plug ins:
Xero>radiance
DSB Flux>Bright Noise
Eye Candy >Gradient Glow

Font of choice

~~~*~~~

OK, let's get started!

Open your template, duplicate and close the original.
Resize to 700 x 700. (we will be re-sizing it smaller at the end)
Delete copyright layer,
all 3 lil circle layers and their frame layers
and the small word art layer.

Flood fill white your background layer.

Select big circle layer,
selections>select all> float>defloat
Copy and paste paper brown as a new layer>
selections invert>delete>
delete the original template layer.

Now copy and paste your tube of choice into the circle
>selections>select none
(I used a close up of my main tube)

Apply Xero > Radiance > default settings
and change the blend mode of the layer to luminance.

Select big circle frame layer,
selections>select all> float>defloat
>Copy and paste paper orange
as a new layer>selections invert>
delete> select none
and delete the original template layer.

Apply DSB Flux >bright noise>intensity 44>mix

Apply Eye Candy Gradient Glow>color: Fat >default setting.

Now apply drop shadows:
V=3 H=3 O=50 B=5
and V= -3 H= -3 O=50 B=5

Apply the above steps to these layers:

Tree with paper teal

Square with paper multi

Square frame with paper brown 1

Select large word art layer>
selections>select all> float>defloat >
Copy and paste into selection paper orange 1
and apply the noise,
gradient glow and drop shadows
same as above.
I moved the word art to the bottom
of the template
(see my tag for placement)

Copy and paste your tube(I mirrored mine)
and place on right side of big circle layer
apply a drop shadow
V=3 H=3 O=50 B=5

Copy>paste circles 2 above your background layer
Apply drop shadows:
V=3 H=3 O=50 B=5
and V= -3 H= -3 O=50 B=5

Now resize your tag to 600 X 600.
Add your name, and your copyright if needed,
delete your white layer and save as a PNG and that's it!!

Mahalo for trying my tut!!


My dear friend Kristi aka Hubbys tried my tut-Great tag Kristi!!


Tuesday, July 7, 2009

Sugar & Spice


Click on image to view full size

I use PSP 7, but assume this can be made with any version

Supplies:

Tube of choice
I used the awesome art of Elias Chatzoudis, which you can purchase at MPT
you must have a license to use his work.

Template 172 by Gina, you can snag it at her awesome blog here
Thank you Gina!

Mask 173 by Vix, you can find her wonderful masks here
Thanks Vix!!

Plug ins:
Xero: radiance
Penta: jeans and color dots
Eye Candy: Gradient glow and glass

Font of choice

~~~*~~~

OK, let's get started!

Open your template>duplicate>close original. Delete copyright layer.
Open your tube(s) of choice and select
one light color for your foreground and
one dark color for the background.
Change your foreground to gradient>style sunburst.
Select circle 1>float>defloat>flood fill
Apply Eye Candy glass>bevel profile:button
with the following settings:


Copy>paste your tube>selections invert>delete>select none
Change the blend mode to luminance
Add a drop shadow to the circle layer
Apply the same steps to circle 2.

Now change the foreground color from gradient to solid.
Select outer frame>float>defloat>flood fill with your light color
Apply Penta>Jeans>default settings

Paste your tube>selections invert>delete>select none in both frames
Apply Xero>Radiance>default settings to both tube layers
Drop shadow tube layers and frame layer.

Select cluster frame>float>defloat>flood fill with your darker color
Apply Penta>Color Dots>default settings> select none.
Add drop shadow.

Select middle frame>float>defloat>flood fill with white.

Paste your tube in center of template>add drop shadow.

Arrange the word art around the top of the tag.

Flood fill the sugar, spice and nice word outlines with
your dark color.
Apply Eye candy>gradient glow>fat with
the following settings:


We are almost finished!

Change your foreground color
back to gradient >style Linear>invert checked
Flood fill your white layer and apply
Vix mask 173, delete mask and flip layer

Now resize your tag to 600 X 600. Add your name,
and your copyright if needed, save as a PNG and it's done!!

I hope you had fun with this tut!!

Friday, July 3, 2009

Morning Delight


Click on image to view full size

I use PSP 7, but assume this can be made with any version

Supplies:

1 Tube of choice
I used the wonderful art of Dean Yeagle,
you must have a license to use his work
which you can purchase at CILM

PTU Scrap Kit Morning Delight (tagger size) by ScrappinDsigns ,
which you can purchase at the Paradise 4 Scrappers store here


Template 173 by Gina, you can snag it at her awesome blog here
Thank you Gina!

Mask Other world fae by Sabre, which you can find here
Thank you Sabre for all your wonderful goodies!

Font of choice, I used MA Sexy

~~~*~~~

Open the template, duplicate and close the original.
Change canvas size to 800 x 800> flood fill white.
Delete the credit info layer

Select the flower swirls layer>float>defloat
Copy>paste paper 15>
selections>invert>delete>select none.
Lower the opacity of the template layer to 50.

Select the leaf swirls layer>float>defloat
Copy>paste paper 16>selections>invert>delete>select none
drop shadow V=3 H=3 O=50 B=5
Delete original template layer

Apply the same steps to the large scalloped layer, using paper 5,
smaller scalloped paper using paper 20,
Oval fill layer using paper 17
and oval frame layer using paper 16

Select the bracket layer>float>defloat
Copy>paste paper 1>selections>invert>delete>select none.
Delete template layer
Apply texture effects>blinds
Apply drop shadows V=3 H=3 O=50 B=5
and V= -3 H= -3 O=50 B=5

Copy>paste your tube of choice and position
slightly off center,
apply drop shadow V=3 H=3 O=50 B=5

Copy>paste ribbon 1>mirror
and place along bottom of template>drop shadow

Copy>paste ribbon 2 and place atop ribbon 1>drop shadow

Copy>paste branch and place atop the ribbons>drop shadow

Open bird>re-size 50% and
paste at bottom left side of template
apply drop shadow V=3 H=3 O=50 B=5

Open flower 005>re-size 50% and paste
at bottom left corner of template
apply drop shadow>layer duplicate>mirror
and place a bit below the original flower layer
(see my tag for placement)

Copy>paste green flower on right side of tag>drop shadow

Open pretty butterfly>re-size 50%
and paste at top left side of tag>drop shadow

Copy>paste tulle 3 above your white background layer,
move towards top of tag>duplicate>flip> and move the
duplicated layer towards bottom of tag.

Copy>paste tulle 2 under your tube layer
and apply drop shadow V=3 H=3 O=50 B=5

Copy>paste paper 4 above your white background layer
apply mask>delete mask

Resize entire tag to 600 x 600.
Add your name, I used stroke white and fill #8FB700
Now just add your copyright if needed
and delete your white layer and save as a PNG!

I hope you enjoyed making this tag!

Wednesday, July 1, 2009

Red, White & Blue

Click on image to view full size

I use PSP 7, but assume this can be made with any version

Supplies:

Tube of choice
I used the wonderful art of Elias Chatzoudis,
you must have a license to use his work which you can purchase at MPT

PTU Red, White & Blue Scrap kit by Jessica
of Gothic Inspirations, which you can purchase here

Jessica's site has so many wonderful scrap kits, PTU & Freebies! !!
Thank you Jessica!

Template 12 by Stef at
Freebie Friends Scraps & More, which you can get here
A great PSP'rs site!!

Plug ins: Penta Jeans & Eye Candy gradient glow

Font of choice, I used International Palms

~~~*~~~
Lots of copying and pasting for the template layers-be prepared LOL

Open your template, duplicate and close the original.
Re-size to 850 x 850.
(we will be re-sizing it smaller at the end)
Delete copyright layer
Flood fill raster layer 1 with white.

Select black star layer,
selections>select all> float>defloat >
Copy and paste kit paper 9 as a new layer>
selections invert>delete> select none
and delete the original template layer.

Apply Eye Candy Gradient Glow>
color: Fat default setting.
Now apply a drop shadow
V=3 H=3 O=60 B=5 then
V= -3 H= -3 O=60 B=5

Apply the same steps to raster layer 2,
but use paper 13,
and on raster layers 3 & 4 using paper 1.

Now, with the magic wand, select inside the first star layer you made
(it was black star) and copy>paste your tube.
Position and invert>delete.
Apply Penta Jeans: Amount>62 Width>4
Change the blend mode to soft light.

Select with the magic wand the Big Top &
big B stars layers and flood fill white.
Apply drop shadow V=3 H=3 O=60 B=5

Select stars layer float>defloat >
Copy and paste kit paper 3 as a new layer>
selections invert>delete>
select none and delete the original template layer.
Apply drop shadow V=3 H=3 O=60 B=5

Copy>paste your tube,
mirror and position to the left of the tag.
Apply the same gradient glow and
drop shadows as the other layers.

Open flower red, re-size 50%
and paste on bottom left side of the template
(see my tag for placement)
Apply the same gradient glow
and drop shadows as the other layers.

Open flower blue2, re-size 50% and
paste on bottom left side of the template
(see my tag for placement)
Apply the same gradient glow and
drop shadows as the other layers.

Open stars3, re-size 75% and place next to red flower.
Apply the same gradient glow and drop
shadows as the other layers.

Duplicate>mirror each of these 3 layers.

Open wordart and re-size 75%
and paste over flower layer>apply the same gradient glow
and drop shadows as the other layers.

Copy>paste glitterspray blue above
raster layer1 and move to top left of tag.

Copy>paste glitterspray red&blue above
raster layer1 and move to bottom right of tag.

Open pass4th and re-size 50%>paste on blue flower
on left side and rotate 15 degrees left>apply
the same gradient glow
and drop shadows as the other layers.

Copy>paste cluster pin
on upper right corner of the template
and erase the pin part covering the
corner (see my tag)

Add a new raster layer and add your name in script,
rotate 15 degrees left and position to your liking.
Apply the same gradient glow and
drop shadows as the other layers.

Resize your tag to 600 x 600,
add your name and copyright if needed
delete your white layer and
save as a PNG and your finished!

Now go grab some fireworks and have a Happy 4th of July!!!

Sunday, June 28, 2009

My Love is like a Red, Red Rose

Click on image to view full size

I use PSP 7, but assume this can be made with any version

Supplies:

Tube of choice
I used the breathtaking art of Dominic Marco ,
which you can now purchase at CILM
you must have a license to use his work.

FTU scrap kit "Red Rose" by Bryska ,
which you can download here

Plug in: Xero Constellation
(you can skip this step if you don't have the plug in)

Font of choice

Drop shadow used: V=3 /H=3 /O=50/ B=5.

~~~*~~~

OK, let's get started!

Open frame _1(30), duplicate and close the original.
Re-size to W-680 H-800
Then change canvas size to 800x800.
Add a layer and drag to bottom, flood fill white.

Using the magic wand, select inside frame
>modify>expand 6 pixels
Open (2) and re-size to 800x800
copy>paste as new layer>selections>invert>delete
and drag below frame layer

Again with magic wand,
select inside white frame area,
Open _1(1) re-size 800x800 >copy>paste as
new layer>selections>invert>delete

Open _(17) re-size 20%>copy>paste
along top of frame,
Duplicate this layer 5 times and spread
across frame.
X out all layers except these and merge visible.
Apply Xero>constellation with these
settings:

Un X all layers.

Copy>paste tube of choice and position
to your liking and add a drop shadow

Open _1(19) re-size 20% >copy>paste as new layer
>image flip>image mirror and position along top
of frame(under it) add drop shadow .
Duplicate this layer and move down a bit
(see my tag for placement)

Open _1(34) re-size to 800x800
>copy>paste above leave layers. Add drop shadow.

Open _1(5) re-size to 800x800 >copy>paste
below frame layers. Add drop shadow.

Open _1(7) re-size 20% >copy>paste
on corner of frame> rotate left 15 degrees>drop shadow

Copy>paste (9) and position under bow,
erase any parts showing above the bow.
Drop shadow

Now resize your tag to 600 X 600.
Add your name, and your copyright if needed,
delete your white layer and save as a PNG
and you're finished!

I hope you enjoyed this tut!!

Friday, June 26, 2009

Je T'aime


Click on image to view full size

I use PSP 7, but assume this can be made with any version

Supplies:

Tube of choice
I used the awesome art of Al Rio , which you can purchase at CILM,
you must have a license to use his work.

FTU scrap kit "Flirty" by Adelina , which you can download here

Thank you Adelina !

Mask 3 by Chas, you can find her wonderful site here


Plug in: Xero, porcelain

Font of choice

~~~*~~~

OK, let's get started!

Open a new image 800 x 800, flood fill white.
Open frame 5, re-size 25%
Copy > paste frame as new layer.

Using the magic wand select inside the frame
>modify>expand 4 pixels

Open paper pp4, re-size to 800 x 800
copy and paste paper
selections>invert>delete.
Drag below frame layer.
Keep selected and copy>paste tube of choice
and position to your liking>selection>select none.

Now add a drop shadow 3/3/50/5
to your tube and frame and
Now apply Xero>porcelain: 50/128/128
to frame, paper and tube.

Open flirty tags, re-size 25%
Copy>paste as new layer and place on left side of frame
>add drop shadow.
Open Jewel 1, re-size 10% and place at top of string
> drop shadow
Erase the bits of string showing at the top.

Open feather 1, re-size 50%
Copy>paste as new layer and place on right side of frame,
below your tube layer.
Duplicate your frame layer and
drag it below the feather layer.
Erase the top frame layers that are covering the feather.


We're almost pau!!(Hawaiian for finished)

Open pp4, re-size to 800 x 800
Copy>paste above white layer, apply mask>delete mask

Now resize your tag to 600 X 600.
I added Je T'aime (I love you) to the small tag
Add your name, I applied a gradiant glow in pink to mine.
Add a copyright if needed,
delete your white layer and save as a PNG and that's it!!

Mahalo for trying my tut!

Sunday, June 21, 2009

Rac Rocks!

Click on image to view full size

I use PSP 7, but assume this can be made with any version

Supplies:

Tube of choice
I used the awesome art of Ismael Rac , which you can now purchase at AMI!!
you must have a license to use his work.

FTU scrap kit "Skool Daze" by Samantha , which you can download here

Thank you Sammygrrl !

Mask 151 by Vix, you can find her wonderful masks here


Plug in: Xero, radiance

Font of choice, I used BadAngelSinner

~~~*~~~

OK, let's get started!

Open a new image 800 x 800, flood fill white.
Copy > paste frame 4 as new layer.
Using the magic wand select inside the first frame
>modify>expand 4 pixels>copy and paste paper of choice
>selections>invert>delete.
Drag below frame layer.
Keep selected and copy>paste tube of choice
and position to your liking>selection>select none.
Now add a drop shadow 3/3/50/5 to your tube layer and
change blend mode to Luminance, layer opacity to 70
Now apply Xero>radiance: 128/50/128/255

Then apply texture effects>blinds:
width:3
opacity: 44
color: white
horizontal: checked

Repeat the above steps to the next two frames,
changing your paper and tube placement.
Also I unchecked the horizontal box on the blinds effect
for the second frame.

For the last (4th) frame, repeat the steps for the paper,
then copy and paste your tube
above the frame layer.(see my tag for placement)
Duplicate your tube layer and drag below the frame layer.
Erase the portions of the tube layers
that extend beyond the bottom of the frame.
Apply a drop shadow to the bottom tube layer,
then move to the top tube layer and
apply Xero radiance, same settings as above.

Now for some fun!
This kit has lots of fun elements!
I added the ticket 3,
re-sized 50% and rotated left 30 degrees,
then the guitar, re-sized 50% and
rotated right 20 degrees ,
skull 1 and lastly swirl 2,
image, mirror layer and drag below all other layers
except bottom white one.
(see my tag for placement of embellishments)
I applied the Xero, radiance to all elements
except the ticket.

Almost finished!!

Copy>paste paper 8 above white layer, apply mask>delete mask>
effects blur>gaussian blur>5.00>
effects>texture effects>blinds:
width:3
opacity: 44
color: white
horizontal: checked

Now re-size your tag to 600 X 600.
Add your name,
I applied the blinds effect to my name and an inner bevel:


and your copyright if needed,
delete your white layer and save as a PNG and that's it!!

I hope you had fun with this tut!!

Thursday, June 18, 2009

Dream

Click on image to view full size
If you share this tut in a group, please leave me a link
in my chat box! Mahalo!!

I use PSP 7, but assume this can be made with any version

Supplies:

Tube of choice
I used the wonderful art of Jennifer Janesko,
you must have a license to use her work which you can purchase at CILM

FTU scrap kit "Go Ahead and Dream" by Bel Vidotti ,
which you can download here

Thank you Bel !

Mask 04 by Chelle aka Weescotlass which you can find here
(this is one of my fav masks LOL)

Font of choice, I used Inspiration

~~~*~~~

This one is quick and easy!

Open a new image 800 x 800, flood fill white.
Copy > paste Glitter frame as new layer.
Add a drop shadow > 3/3/50/5.
Effects > Xenofex 2 > constellation with these settings:
5.19
23
5
12
69
58
rotation: 45

With the magic wand, select inside the frame,
modify > expand 12 pixels.
Copy > paste paper PP03 as a new layer >selections invert > delete >select none.
Move this layer below the frame layer.
X out your white layer and merge visible the frame and paper layer
re-size 125% and make your white layer visible again.

Copy > paste your tube and place in center of frame
(see my tag for placement) Resize your tube if needed
and add a drop shadow.

Copy > paste cloud04 and position at the bottom of your tube.
Copy > paste moon2 as a new layer and re-size it
80%, position at the top left of your tag.
Copy > paste string 03 and place below your moon layer > dropshadow.

Copy > paste paper PP13 above your bottom white layer.
Apply mask 04 >delete mask. Copy > paste Sparkles
above mask layer >duplicate layer > flip.

Now resize your tag to 600 X 600.
Add your name, and your copyright if needed,
delete your white layer and save
as a PNG and that's it!!

I hope you enjoyed this tut!!

I had a good friend request a unicorn tag, so I used this tut for it too:


Tuesday, June 9, 2009

Movie Night


Click on image to view full size

I use PSP 7, but assume this can be made with any version

Supplies:

Tube of choice
I used the wonderful art of Dominic Marco,
you must have a license to use his work which you can purchase at CILM

FTU scrap kit "At the Movies" by Patty at Honored Scraps ,
which you can download here
Thank you Patty!
This is part of a blog train be sure to check out all the stops!

Font of choice, I used A&S Snapper

~~~*~~~

This one is pretty easy!

Open a new image 800 x 800.
Copy and paste element film curled as a new layer.
Image rotate > 90 degrees left.

Using your magic wand tool select inside
each of the frames(hold down the shift key to keep them all selected)
Now copy and paste your tube of choice and position
in the film strip to your liking, selections > invert > delete > select none.
Change the blend mode of your tube layer to luminance.
Layers >merge visible and move this merged layer to
the left side of your canvas. Add a drop shadow.

Copy and paste clapboard 5 and drag under the merged layer.
(See my tag for placement.)

Copy and paste your tube again and position
between the filmstrip and clapboard and add drop shadow.

Now we are going to add a spotlight effect to the tube:
Effects > illumination effects >lights>spotlights.
Click the 3 light tab and position the center one above your tube,
and change the intensity to 81.

Copy and paste admit one and place at bottom of your tube,
add drop shadow, then copy and paste bow one and place on
corner of clapboard and add drop shadow.

Open movie night text and re-size 50%
and position on the top right hand side
of your clapboard and drop shadow.

Add a new raster layer and add your name.
Rotate in right 25 degrees and position on the clapboard.

Now resize your tag to 600 X 600.
Add your name, and your copyright if needed, save as a PNG and that's it!!
Now pop some popcorn and relax!!


Here's a great tag sent to me by Tiny- it was the first tag she's ever made!!!
Thanks for the beautiful tag and for trying my tut hun!

Saturday, June 6, 2009

Sweet Cheeks


Click on image to view full size

This tut was a Tut of the Week on AMI's Blog!! see it here

I use PSP 7, but assume this can be made with any version

Supplies:

Tube of choice
I used the wonderful art of Amy Matthews,
you must have a license to use her work which you can purchase at AMI

FTU scrap kit "Lemon Lime and Bitters" by Jo, which you can download here
Jo has lots of great stuff on her blog!

Template MC Template 19 by Melissa, which you can find here
Her blog is one of my favs! Be sure to check it all out!!

Plug ins: Eye Candy Glass and Xero porcelain

Font of choice, I used MA Sexy

~~~*~~~

This one is a lot of copy and pasting LOL

Open the template, duplicate and close the original.
Re-size canvas size to 800 x 800 and flood fill raster layer 3 with white.
Delete the copyright, skulls, scroll and word art layers as we won't be using these for this tag.

Select your oval layer, float and defloat, copy and paste paper 9 as a new layer.
Selections invert/delete selections, select none and delete the original oval layer.

Now select your rectangle layer, float and defloat, copy and paste paper 15 as a new layer.
Selections invert/delete selections, select none and delete the original layer.

Next, select your oval frame layer, float and defloat, copy and paste paper 5, Selections
invert/delete selections, select none and delete the original layer.
Apply eye candy glass, Bevel profile "subtle hump"
and a drop shadow 3/3/50/5 and -3/-3/50/5

Next, select you frames layer, float and defloat, copy and paste paper 5, Selections invert/delete
selections, select none. Now delete the original layer,
and apply the eye candy glass and drop shadow same as the oval frame.

Select dots layer, float and defloat, copy and paste paper 8,
Selections invert/delete selections, select none and delete the original layer.

Select frame backgrounds layer, selections select all, float and defloat, copy and paste paper 4,
Selections invert/delete, delete original layer, keep selected and copy and paste your tube in the
upper frame, delete, paste again and position in the bottom frame, delete. Change blend mode of
both tube layers to luminance and apply Xero porcelain to them both.
Add a drop shadow of 3/3/50/5.

Your tube should still be on your clipboard so go ahead and paste it one more time and position
between the two frames or to your liking. Add dropshadow 3/3/50/5.

Now we are going to embellish it a bit!
I added netting 3 above raster layer 3 and rotated it 45 degrees left.

Copy and paste deco 4, re-size it 53% and place int the center of the rectangle layer
(see my tag for placement) drop shadow 3/3/50/5.

Copy and paste hibiscus, re-size 60% and place at the bottom left of the tag.
Add a drop shadow and duplicate the layer, and mirror.

Copy and paste flower 3, re-size 50%, drop shadow and place inside of left hibiscus, duplicate the
layer, and mirror. And then copy and paste flower 6, re-size 75%
and place in center of flowers and add drop shadow.

We are almost done!! Copy and paste button frame above raster layer 3, add drop shadow.
Then copy and paste bow 10, re-size 85% and position on the upper left corner of the button frame-add drop shadow.

Now resize your tag to 600 X 600. Add your name, and your copyright if needed,
delete your white layer and save as a PNG and that's it!!


Thursday, June 4, 2009

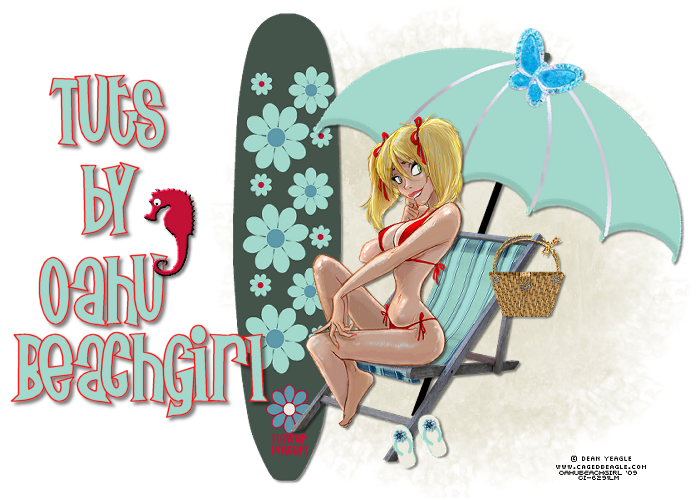
Life's a Beach!


Click on image to view full size

I use PSP 7, but assume this can be made with any version

Supplies:Align Center

Tube of choice
I used the wonderful art of Dean Yeagle,
you must have a license to use his work which you can purchase at CILM

FTU srap kit "The Big Kahuna" by Dianna, which you can download here
Make sure to give yourself lots of time to check out her blog!!
Thank you Dianna!

Mask 04 by Chelle aka Weescotslass, which you can find here

Thank you Chelle! I love your work!

Font of choice, I used Surf Safari

~~~*~~~
Ok, this is gonna be a quick and easy one!

Drop shadow used throughout 3/3/50/5,
(I added it to all elements in the tag.)


Open a new image 800 x 800, floodfill white.
Open deckchair 6, re-size 75% and paste as new layer.

Copy and paste your tube so it is sitting on the chair( if possible)
Open beach umbrella 3 and paste as new layer,
rotate right 20 degrees and place beneath the chair layer.

Copy/paste surfboard 2 and place to the left of the deck chair
(see my tag for placement)

Open beach bag3 and re-size 20%,
paste so it is hanging from the deck chair
and erase part of the handle so it looks like it is looped on the rail.

Open flip flops2 (here in Hawaii, we call them "slippers" LOL)
re-size 20% and place them beside chair.

Copy/paste paper 7 above bottom white layer.

Apply mask 04, and delete mask.
Duplicate this layer and move them to cover more of the tag area.

Now, before you add your name,
re-size your tag to 600 X 600.

Add your name, (I used red for the stroke, turquoise for the fill
and added a thick white gradient glow)

Now open seahorse 1, re-size 30% and place on your name.
(I moved the flip flop layer up and placed them on my name too)

Now just add your copyright if needed, delete your white layer and save as a PNG
and you're all done and ready for summer!!


Monday, June 1, 2009

Rainbow Wishes


Click on image to view full size

I use PSP 7, but assume this can be made with any version

Supplies:

Tube of choice
I used the wonderful art of Elias Chatzoudis,
you must have a license to use his work which you can purchase at MPT

FTU Rainbow Wishes Scrap kit by Melissa, which you can download here
Melissa's site has so many wonderful PSP goodies!!
Thank you Melissa!

Template 4 by Vella at Wench Designs, which you can get here:
She has an awesome website!!

Mask 259 by Vix, which you can find here
Thank you Vix! Your sites ROCK!!

Plug ins: Mura Meister Copies and Eye Candy gradient glow

Font of choice, I used DC Kristy

~~~*~~~

Drop shadow used throughout 3/3/50/5

Melissa's kit is all in layers, so that is how I will refer to the various pieces used in this tut : )


Open your template, duplicate and close the original. Re size to 800 x 800.
Select the middle background layer with the magic wand.
Modify selection-expand by 3.
Copy and paste kit layer 16 as a new layer, selections invert, delete, select none.
Now delete the original template layer.
Do the same process with the left and right backgrounds
but copy & paste kit layer 21 to both.
Selections, select none.

Now, again with the magic wand, select the the left, right and middle frame layers and copy/paste kit layer 22, invert, delete, Selections, select none.
Add a drop shadow and delete the original template layer

Activate the diamond circle layer, selections-select all.
Float and defloat then copy & paste kit layer 21, invert, delete, Selections, select none.
Now delete the original template layer and
apply eye candy gradient glow-thin to the diamond layer.

Copy and paste your tube over the middle frame section of the template and drop shadow.

Add a new raster layer and rename "text"
Add your name(floating, antialias) in a small size font
(I used 16) Move to the top center of the left frame.
Selections, select none.
Now activate your left frame background layer,
selections select all, float and defloat-
now go back to your text layer and apply Mura Meister copies:
Wave (Vertical)
v-wave
wraparound
settings: (depending on your text, you may have to adjust these)
9
20
100
-10
0
100
0
100
0
0
30

Copy the text layer and paste on the right side frame background.

Open kit layer 21 and resize to 800 x 800.
Copy and paste as new layer above the white background layer.
Apply Vix mask 259, delete mask.
Duplicate the mask layer and resize it by 75%,
and mirror this layer.

Now for the really fun and creative part!
This kit has so many beautiful elements,
so embellish your tag with as many as you like!!

Re-size your tag to 600 x 600, add your name and copyright if needed
delete your white layer and save as a PNG and you're finished!


Tuesday, May 19, 2009

Ava Adore

Click on image to view full size

I use PSP 7, but assume this can be made with any version

Supplies:

1 Tube of choice
I used the wonderful art of Dominic Marco,
you must have a license to use his work which you can purchase at CILM

FTU Scrap Kit Ava Adore by Cin, which you can download here
There are so many great FTU kits on her site!!


Mask SL-New Eon by Sabre, which you can find here
Thank you Sabre for all your wonderful goodies!

Font of choice, I used Words of Love

~~~*~~~

Drop shadow used throughout 3/3/50/5


Open a new image 800 x 800 flood fill white
Open frame JB-AA 0052 and paste as new layer, rotate it 90 degrees left and drop shadow
With the magic wand tool select inside the frame, modify selections/expand by 8 pixels.
Now copy and paste as a new layer paper 8, invert selection and delete.
Move this layer beneath the frame layers, selections, select none.

Now copy and paste your tube of choice above the frame layer and drop shadow.

Copy and paste element 0015 to bottom of frame(see my tag for positioning)
Rotate left 30 degrees and drop shadow.

Next, open element 003 and re size 50% and position over to left of branch,
drop shadow, then duplicate the flower and re size 75%
and position to your liking.

Open element 002 and re size 30%, position and drop shadow.

Open element 0035 and position under the
frame and paper layer in the top right hand corner of the frame.

Now open 0019, re size 80% and paste on the right hand corner of the frame.

Now, we are almost finished!
Open heart element 0027, re size 50% and position
at the bottom left side of the frame and rotate 10 degrees left, drop shadow.

Add a new layer and add your name to the heart.

Re size entire tag to 600 x 600. Paste paper 006 above the white layer.
Apply mask, delete mask and duplicate this layer.

Now just add your copyright if needed and delete your white layer and save as a PNG!

I hope you enjoyed making this tag!

Friday, May 8, 2009

Blue Jean Baby


Click on image to view full size

I use PSP 7, but assume this can be made with any version

Supplies:

3 Tubes of choice by the same artist
I used the wonderful art of Dean Yeagle,
you must have a license to use his work which you can purchase at CILM

FTU Wacky Scrap Kit 4 by Lori, which you can download here
Lori's site rocks and all her kits are FTU!!
Thank you Lori!!!

Mask 147 by Vix, which you can find here
Thank you Vix for all your wonderful goodies!

Plug in(optional) Xero porcelain

Font of choice, a block type works best

~~~*~~~

Drop shadow used throughout 3/3/50/5


Open a new image 800 x 800 and flood fill white
Open frame 2 and paste as new layer, arrange to left side, drop shadow
Paste the frame again and resize 50%, drop shadow. Duplicate layer and arrange both
on right side of large frame. (See my tag for placement)
With the magic wand tool select inside the large frame,
then holding down the shift key,
select inside each of the small frames.
Modify selection/expand by 3 pixels. Now copy and paste paper 4 as a new layer,
invert selection and delete.
Move this layer beneath the frame layers.

Now once again with the magic wand select inside the top small frame,
modify selections/expand by 3 pixels. Now copy and paste as a new layer
one of your tubes.
Position to your liking/invert and delete. Move beneath frame layer.
Set the blend mode of the tube to luminance.
Now apply xero/porcelain.
Repeat with the 2nd small frame.

On the large frame, repeat the same, but position the tube to the
right of the frame, then repaste the same tube above the frame,
off to the left and apply a drop shadow.
(see my tag for positioning)

Now open bow 2 and paste as a new layer between the two small frames,
rotate left 25 degrees/drop shadow.
Then paste again between the top small frame and large frame/dropshadow.

Resize all layers to 600 x 600.
Copy and paste paper 4 and position as your very bottom layer.
Apply Vix mask 147/delete mask. Then apply it again to your white layer.

Add your name (I used a block font/white stroke and
paper 2 as the fill)
Add any embellishments you like
(I added a bow to my name, and snaps to the bows)
Add copyright if needed and save
as a PNG and you're finished!

I hope you had fun with this tut!

Sunday, May 3, 2009

Sweet Watermelon


Click on image to view full size

I use PSP 7, but assume this can be made with any version

Supplies:

Tube of choice
I used the wonderful art of Dean Yeagle,
you must have a license to use his work which you can purchase at CILM

FTU Watermelon Scrap kit by Bel Vidotti, which you can download here
I love her site, she has lots of awesome FTU Scrap kits!!
Thank you Bel!

Mask 174 by Vix, which you can find here
Thank you Vix for all your wonderful goodies!

Font of choice, I used Chick

~~~*~~~

Drop shadow used throughout 3/3/50/5

Open a new image 800 x 800, flood fill white
Copy and paste frame01 as a new layer
Using the magic wand tool click inside the frame,
make sure to select all the small white areas around the bow :)
Selections modify, expand by 3
Copy and paste paper 8 as a new layer,
selections invert, delete. Selections, select none.
Move this layer below your frame layer.

Now copy and paste your tube and move below your frame and add drop shadow
Duplicate your tube layer and bring to top.
Now erase any parts of your tube that are covering the bow at the bottom of the frame
(see my tag as example of placement)

Now paste paper 8 as a new layer above your bottom white layer, and apply mask,
delete mask and merge layer. Now duplicate the mask layer, mirror and flip.

Open Watermelon buckle and resize by 50% and paste on top left of your frame,
add drop shadow.
Open watermelon tag and resize 50% and paste below the buckle, add drop shadow.
Open butterfly 1, resize 30% and paste on the watermelon tag, rotate right 20 degrees
add drop shadow
Open butterfly 2 and resize 50% and place on top right side of frame,
rotate left 20 degrees and add drop shadow

Now resize your tag (I usually make mine 550 x 550)
add your name, I used paper 7 as my fill, scale 10.
Finish with the proper copyrights, delete your bottom white layer
if you wish to save it transparent and save as a PNG.

I hope you had fun with this tut!


Saturday, May 2, 2009

LaPush Tutorial

Click on the image to see the full size preview

I use PSP 7, but assume this can be made with any version


Supplies:

Tube of choice, I used the artwork of Martin Abel,
you must have a license to use his work which is available at CILM

FTU Scrapkits: Down LaPush and Twighlight by Sunf at Urban Fairytales here
Check out her blog while you are there, she has so many goodies!! Thank you Sunf!!


Font of Choice, I used a grunge style font

~~~*~~~

Drop shadow used throughout: 3/3/50/5 Black

Open a new image 650 x 650, floodfill white
Add in frame UFlapushclusterframe
Using the magic wand tool, click inside the frame, selections modify expand by 12
paste lapush paper1 as new layer, selections invert, delete and
Move this layer below your frame layer. Now with the frame still selected copy and paste your tube of choice as a new layer and hit delete, select none and move this below your frame layer.

Open UFleavesLapush and paste as new layer above your bottom layer,
position at the upper left side of the frame

(see my tag for referance) add drop shadow. Duplicate layer, flip and move a bit to the right. Duplicate this layer twice, and mirror both, position along right side of frame.

Open UFfoligelapush and paste above other leaves layers,
rotate to the left 90 degrees and position.

Open UFLapushmist and paste over your leaves layer, position to your liking.
Open UFbutterflycluster and paste above the mist layer. Apply drop shadow


Now embellish with the accents of your choice,
I used UFTwilightflowers1, 2 and 3 from her Twighlight kit.

Resize the tag if needed and add your name.
I resized the element UFLapushmist and placed over part of my name.

Add your copyright and watermark. Delete the bottom white layer and save as a PNG
and you are finished!

I hope you enjoyed my first tutorial!

Here's a tag my friend Kristin made-
her first time following a tut!
She did a great job on it!!

(Click on tag to view full size)

Aloha


Well, I have decided to try my hand at writing PSP tutorials! I should have my first one up in the next couple of days! It will be of this tag: